
Remember that you have a quiz tomorrow on Tuesday's class reading.
I have not received the Eastman House assignment from some folks. Please send along.
Personal photo project details.
Personal Photo Project is due Wednesday, May 11. This will give you two weekends. Be mindful that we will be working on supporting material next week. You will have Monday, May 9 and Tuesday, May 10 to work on the organization and writing component of the project.
Of what will this consist?
You may take as many pictures as you wish, but you will share only 10 images with the class.
Can I have more?
No.
How will these be shared?
You may have them on a Prezi or a Power Point or some other similar program. Put your power point on a thumb drive, please, rather than sending through e-mail.
So what are the parameters for taking these pictures?
You must have an objective, a theme, a controlling idea; that is a clearly defined point to taking your series of photos.This may range from something expressive or emotional to an event or occasion. This is not to be a haphazard collection or arrangement of images, but a thoughtfully planned out goal that unites an idea and demonstrates your proficiency in using various photo techniques to convey your ideas.
Can it be from some place I already took pictures?
No, these are new images that demonstrate you have an understanding of the rules of composition, as used them to express your photo objective.
What type of pictures must these be exactly?
You may organize these how you wish, but within the pictures you must demonstrate your understanding the following:
close-up
mid range shot
establishing shot
symmetry
use of foreground
conscious incorporation of texture
rule of thirds
understanding of the placement of the horizon line
conscious incorporation of details / texture
varied perspective (tilting up or down)
framing
lighting
Obviously, more than one of these will be included in a shot; however, each must be addressed at some point.
Paper Part
Not everyone can present on Wednesday, May 11, but everyone must turn in the following graphic organizer. Be mindful that there is writing component of the organizer. (class handout or adapt from below) Don't forget the reflection piece at the end. Note that you will have class time on Monday and Tuesday, May 9 and 10 to assemble the writing component and Prezi / Power Points. Make sure to have your photos with you. There will be no class time on the 11th; I'll just collect your paperwork. If you wish you may put a copy of your photo onto the graphic organizer.
Photojournalism Project Name_________________________________________________
Photo project objective statement:
____________________________________________________________________________________________________________________________
1
|
setting/ time
|
brief description of image
|
type of shot/ technical
goals demonstrated |
2
| |||
3
| |||
4
| |||
5
| |||
6
| |||
7
| |||
8
| |||
9
| |||
10
|
In approximately 250 words, describe your process of taking the photos, including any pleasures, frustrations and obstacles you encountered.
Ten tips for taking better photos
1. Hold It Steady
A problem with many photographs is that they're blurry.
Avoid 'camera shake' by holding the camera steady. Use both hands, resting your
elbows on your chest, or use a wall for support. Relax: don't tense up. You're
a marksman/woman holding a gun and it must be steady to shoot.
2. Put the Sun Behind
You
A photograph is all about light so always think of how the
light is striking your subject. The best bet is to move around so that the sun
is behind you and to one side. This front lighting brings out color and shades,
and the slight angle (side lighting) produces some shadow to indicate texture
and form.
3. Get Closer
The best shots are
simple so move closer and remove any clutter from the picture. If you look at
most 'people' shots they don't show the whole body so you don't need to either.
Move close, fill the frame with just the face, or even overflow it. Give your
shot some impact. Use a zoom to crop the image tighter.
4. Choose a Format
Which way you hold the camera affects what is emphasized in
your shot. For tall things (Redwoods, Half Dome) a vertical format emphasize
height. Use a horizontal format to show the dramatic sweep of the mountains.
5. Include People
Photographs solely of landscape and rocks are enjoyable to
take but often dull to look at. Include some of your friends, companions,
family, or even people passing by, to add human interest. If there's no one
around, include yourself with the self-timer.
Have you ever got your photos back only to discover that
something that looked awe-inspiring at the time looks dull on paper? This is
because your eye needs some reference point to judge scale. Add a person, car,
or something of known size to indicate the magnitude of the scenery.
6. Consider Variety
You may take the
greatest shots but if they're all the same type or style, they may be dull to
look at. Spice up your collection by adding variety. Include landscapes and
people shots, close ups and wide angles, good weather and bad weather. Take
personal shots that remember the 'being there' - friends that you meet, your
hotel/campsite, transportation, street or hiking signposts.
7. Add Depth
Depth is an important quality of good photographs. We want
the viewer to think that they're not looking at a flat picture, but through a
window, into a three-dimensional world. Add pointers to assist the eye. If your
subject is a distant mountain, add a person or a tree in the foreground. A wide
angle lens can exaggerate this perspective.
8. Use Proportion
The beauty of an image is often in its proportions. A
popular technique with artists is called the Rule of Thirds. Imagine the frame
divided into thirds, both horizontally and vertically, like a Tic-Tac-Toe
board. Now place your subject on one of the lines or intersections. Always
centering your subject can get dull. Use the Rule of Thirds to add variety and
interest.
9. Search for Details
It's always tempting to use a wide angle lens and 'get
everything in'. However, this can be too much and you may loose the impact.
Instead, zoom in with a longer lens and find some representative detail. A shot
of an entire sequoia tree just looks like a tree. But a shot of just the tree's
wide base, with a person for scale, is more powerful.
10. Position the
Horizon
Where you place the horizon in your shot affects what is
emphasized. To show the land, use a high horizon. To show the sky, use a low
horizon. Be creative.
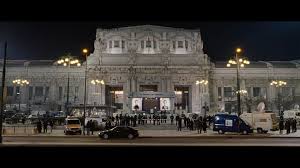
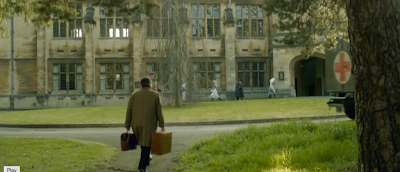
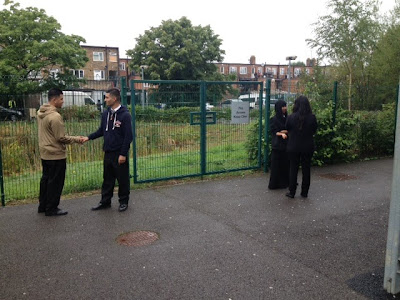
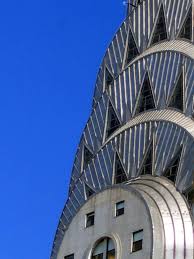
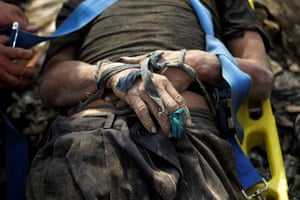
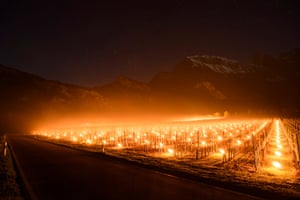
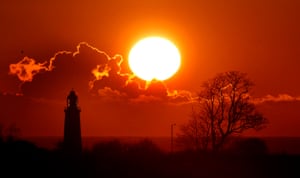
Three types of photos dominate photojournalism
1.establishing shots, 2. mid-range shots and 3. close-ups.
Let's practice identifying them. What other terms might you use to describe them?
1.

2.
3.
4.
5.
6.
7.
8.
9.
10.

11.
12.
13.
14.
15.
16.
17.
18.
19.
20.
21.
22.
23.
24.
Three types of photos dominate photojournalism
1.establishing shots, 2. mid-range shots and 3. close-ups.
Let's practice identifying them. What other terms might you use to describe them?
1.
2.
3.
4.
5.
6.
7.
8.
9.
10.
11.
12.
13.
14.
15.
16.
17.
18.
19.
20.
21.
22.
23.
24.
No comments:
Post a Comment